Writing Sensory-Motor Loops in ROS
Today
- Using the Command Line
- More on Nodes
- Writing Sensory-Motor Loops for a Neato
- Project Work Time
For Next Time
- Review today’s notes and make sure that you run your collision avoidance code on a real Neato.
- Work on the RoboBehaviors and FSMs (Due Sept 22nd at 7PM). Please add yourselves to a team in Canvas.
- It is recommended that by the next class you complete: finishing today’s in-class exercise (collision avoidance) and designing your FSM
- It is recommended that by the next class you attempt: driving in a shape (to be finished next time in class)
- Get started on the Broader Impacts assignment (Due Sept 29th at 7PM).
Using the Command Line
In Ubuntu (and other Linux/unic based operating systems) developers often make use of the command line. This is a headless way (that is, there is no GUI or rich interactive API) to deploy code, interact with hardware, or run diagnostics on your system. Getting familiar with the command line is a small skill-oriented learning goal for this class.
Becoming a command line wizard definitely doesn’t happen overnight, and comes with practice and some understanding about the capabilities of the command line. This resource, assembled by a previous CompRobo CA, is a great guide for getting started. We will demo a few key commands that you may want to start practicing today.
Day 2 Recap: More on Nodes
Let’s go ahead and launch the two nodes that we wrote last time. In one terminal, run your send_message node:
ros2 run in_class_day02 send_message
and in another, run your recieve_node:
ros2 run in_class_day02 recieve_node
Uniqueness of Node Names
ROS2 Nodes should have unique names. There is support for changing the node name when launching a node (or specifying a unique name in the launch file). If you start two nodes with the same name, the system will allow you to do it, but you will get a warning that things might go bad (ominous!). For example, I can set the name of the teleop node as follows.
$ ros2 run teleop_twist_keyboard teleop_twist_keyboard --ros-args --remap __name:=my_name
You can verify this worked, by running the following command.
$ ros2 node list
Try launching another send_message node without changing the name, and then with changing the name. What do you notice when trying to run this node? What does your node list look like? What does your topic list look like?
Listening to ROS2 Traffic
We discussed multiple ways to diagnose whether your publishers are operating as expected; any of the following commands can get you to interfaces that verify that your topic is publishing and that the information appears correct:
$ ros2 topic list
$ ros2 topic echo /topic-name
$ rviz2
$ rqt
How do we know if our subscribers are working? Well, we can see if the node is initialized by running:
$ ros2 node list
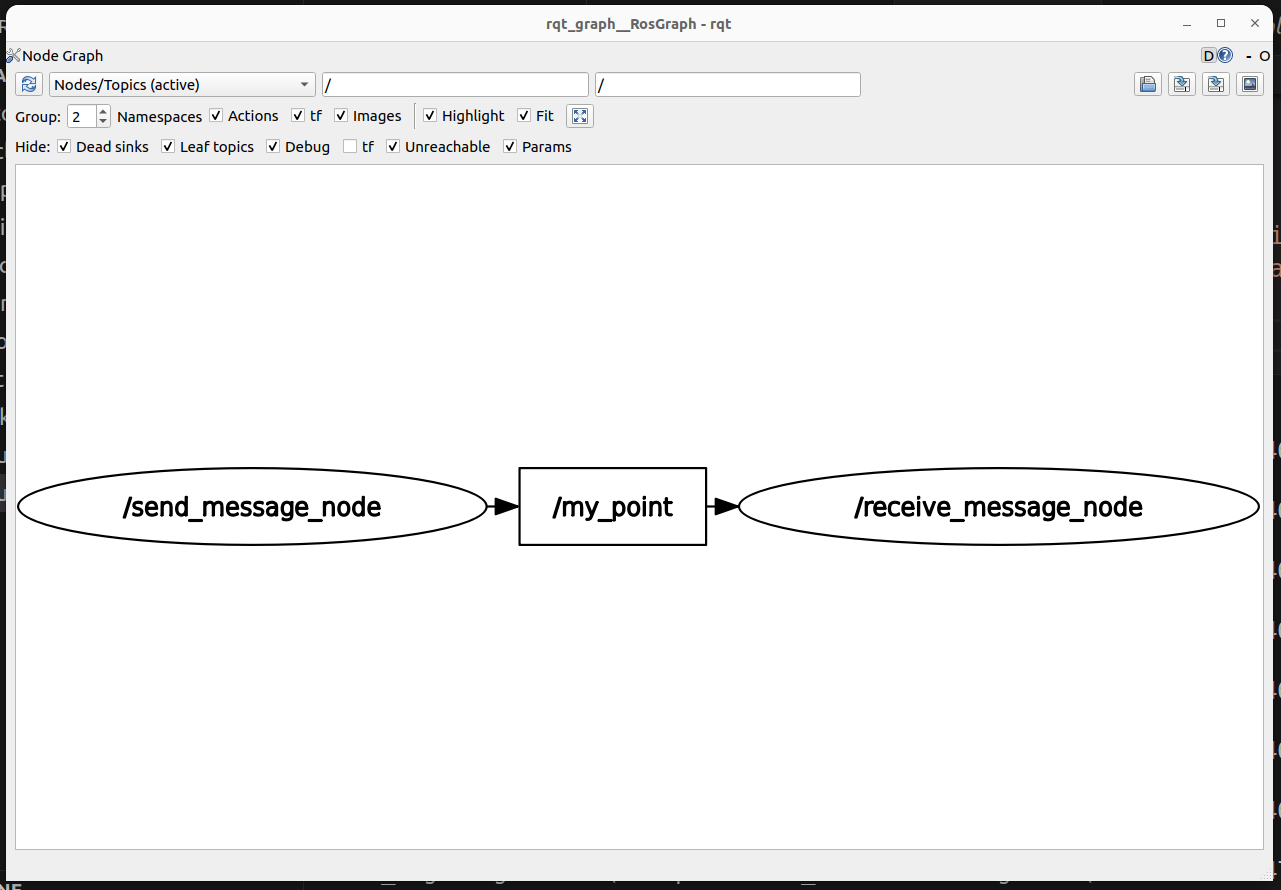
But if we want to know whether the node is actually receiving data properly, we’ll need to add code in our subscribers that will either print messages to terminal (for manual inspection), throw time-out errors if we don’t get any messages (and expect to get some within certain windows of time), or record rosbags for later debugging. You can also consider adding tools like ros2doctor (https://index.ros.org/p/ros2doctor/) that can perform some diagnostic functions on your ROS2 network. And you can check if all the message “plumbing” looks right by using the utility rqt_graph:
$ ros2 run rqt_graph rqt_graph
which will show you a map of your nodes and messages:
Sensory Motor Loops
We’ve spent some time now just using ROS2 to pass messages around our computer…let’s now use it to actually interact with some sensors and actuators. One way to think of the “intelligence” that drives a robot is as a sensory-motor loop.
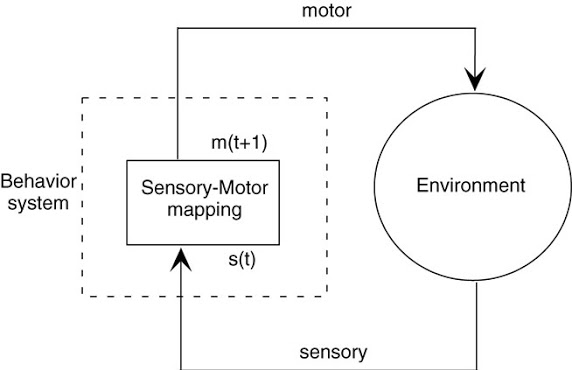
Today, we will be building on the basic ROS nodes we wrote last time to create a ROS node that both integrates sensory data (through subscribing to a topic) and outputs a motor command (by publishing to a topic). Perhaps one of the first things you should always consider when working with a robot, is how to keep it, and you, safe. Let’s build some software-side emergency stop and collision avoidance features.
In the RoboBehaviors project parlance, we will be building a Basic behavior, which we expect to be implemented and included in your final project materials.
Connecting to a Neato
For the purposes of our in-class development, we’re going to make use of the Neato simulator. As homework (or later on in this class), we recommend actually connecting to a Neato and running all of this code again to see how it performs in the real world! You might notice some performance differences which are important to note…
If you are running the simulated Neato, launch a simulation in the gauntlet world with:
ros2 launch neato2_gazebo neato_gauntlet_world.py
If you are connecting to a real Neato, make sure to follow the
ros2 launch neato_node2 bringup.py host:=IP_OF_ROBOT
Creating our First Sensory Motor Loop
Sample solutions to this can be found in the
class_activities_and_resourcesGithub repository underin_class_day03_solutions. (if you are looking for the C++ solutions, look in the directoryin_class_day03_cpp_solutions).
Find another person in the class to work with (ideally your partner/partners for the RoboBehaviors project). In pairs, you will begin to explore the idea of a sensory-motor loop on the Neatos.
Design Phase
Before touching any code, let’s get clear on what we would like our node/nodes to do. We want to build a collision avoidance behavior, such that when the robot that is otherwise being commanded to move forward approaches a wall or object, it is commanded to stop before colliding with that object.
In your groups, consider the following:
- What sensors does the Neato have to detect proximity? What topic(s) are these data published over?
- What topic controls the Neato’s motion? What should the command be to stop the Neato?
- What logic should the robot use to know when to slow down or stop? (Hint: you can think about hard thresholds, graceful stops using controllers like proportional control, etc. This is a question to prompt you to think about data flow in your node and reactions/actions).
Write some pseudocode down or take notes of your answers, to help you build your package in the next steps.
Create a Package
Once you know what you want your software to do, go ahead and create a package for the code that you will be writing today. As with all ROS packages in your workspace, it must be inside of your ros2_ws/src folder. Besides this requirement, you are free to put the package anywhere. We recommend creating your package with commands like the following:
$ cd ~/ros2_ws/src/class_activities_and_resources
$ ros2 pkg create in_class_day03 --build-type ament_python --node-name emergency_stop --dependencies rclpy std_msgs geometry_msgs sensor_msgs neato2_interfaces
Bump Emergency Stop
The first sensory-motor loop we will create is one in which the robot moves forward at a fixed speed until it senses an obstacle using the bump sensor and then stops. For a rundown of the bump sensors on the Neato, check out the
Hints:
- You may want to start with some of the code we wrote last time to create a skeleton for your team to edit.
- You need a way to access the bump sensor data, and once you have that data, tell the Neato what to do with certain inputs. Consider listing out what you need to subscribe to, and what you need to publish to start.
- Assuming you are using classes to define your ROS nodes, you can create a class attribute (
self.attribute_name) to share data between class methods. - If you execute the
ros2 pkg createcommand given above, there should already be a file calledemergency_stop.pycreated for you. If you placed your package inros2_ws/srcit will be located at:~/ros2_ws/src/class_activities_and_resources/in_class_day03/in_class_day03/emergency_stop.py.
Proximity Emergency Stop: Using the Laser Range Finder
The next sensory-motor loop that you create should be called distance_emergency_stop.py. In order to add this node, you will have to modify the setup.py file in your in_class_day03 package (like we did on day 2 with our recieve_message node).
The distance_emergency_stop.py node should be identical to emergency_stop.py except it should use the laser range finder to detect when an obstacle is within a specified distance and stop if this is the case. It is up to you how you implement this. You can either use just the measurements in front of the robot, or perhaps use all of the measurements. You may want to use an all-or-nothing control strategy (also called bang-bang) where you are either going ahead at some fixed speed or you stop completely. Alternatively, you may use something akin to proportional control where your speed slows proportionally with how close you are to the target distance. Again, for more detail on using the Neato sensors (including the laser range finder), see the
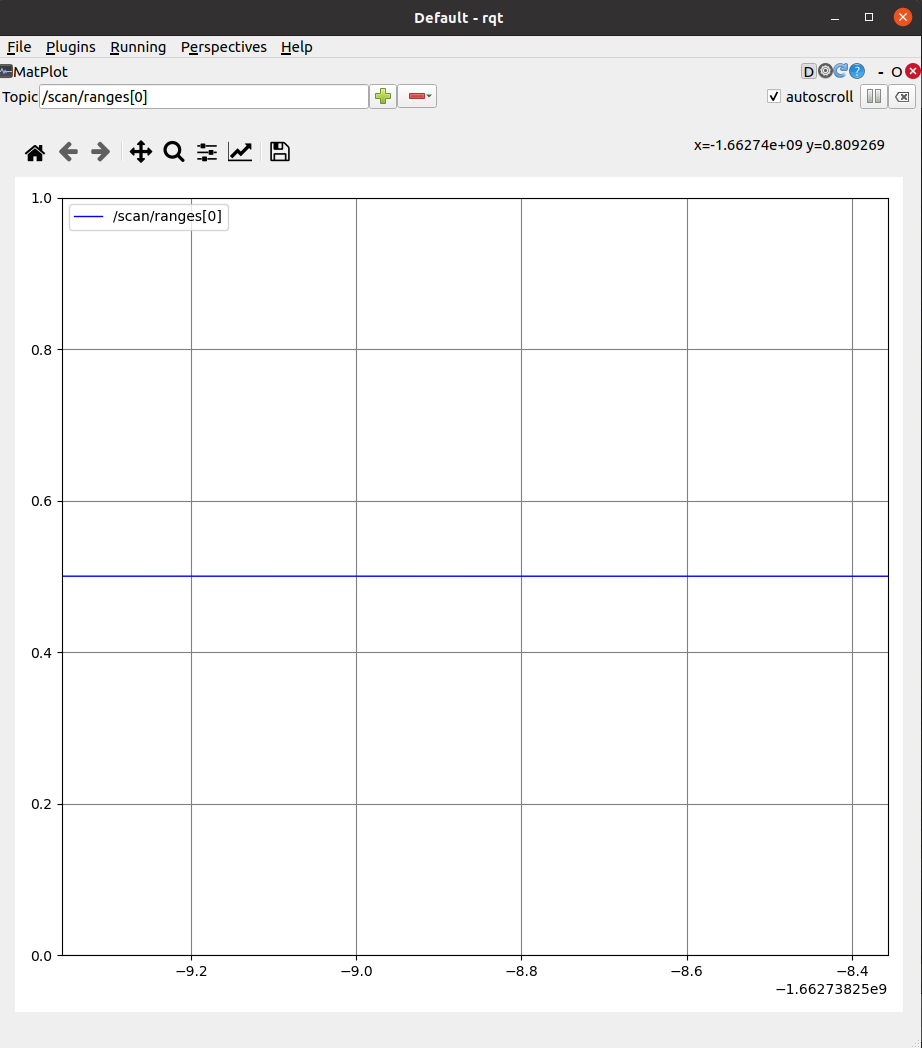
Once you implement this, you may consider using the command line tool rqt to add a visualization of the laser scan data. This plot shows scan/ranges[0] (the measurement straight ahead). For a 0.5m target distance, here is what rqt may show:
Project Work Time
With the time you have remaining in the class, and with your project partner(s), consider working on the following:
- Integrating today’s code into your project package (and testing it on a real robot!)
- Designing your finite-state-machine (brainstorming what different behaviors you might like to create, how you might chain them together)
- Getting started with developing a fundamental behavior, like driving in a square, or an advanced behavior, like wall following
As a process for developing more behaviors on the Neato, we recommend the following:
Look at the assignment description and work on the following with your project team:
1) Sketch an outline of a ROS Node that acts out the behavior you’ve chosen. Do this on a whiteboard, not on a computer. Pay attention to:
- What are the inputs/outputs to the node; what does this mean about callbacks, subscribers, and publishers?
- What message types might you be expecting?
- What aspects of the robot can you control?
2) After you have an outline, draw up the skeleton code for a Node on a computer, adding comments that capture your pseudocode. Make sure your skeleton code can compile and run as designed, before you start implementing all your logic.
3) Start implementing the elements of your pseduocode. Consider how you can test that your code is working along the way. For instance:
- Are there places you can add strategic
printstatements? - Would logging a message through ROS be useful?
- Do you want to make a publisher to transmit certain information that can be visualized in RViz?